
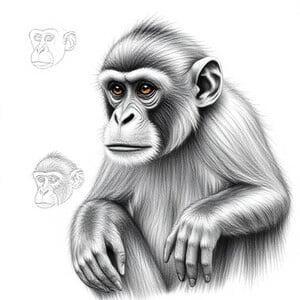
Realistic monkey drawing captures the intricate details of a monkey’s fur, facial expressions, and body posture with lifelike precision. Artists use fine pencil strokes, shading, and highlights to bring out depth and texture, making the drawing appear almost three-dimensional. The eyes, often the focal point, convey intelligence and emotion, enhancing the realism. Attention to muscle structure and natural poses further adds authenticity. Background elements, such as trees or rocks, can provide context. Whether in graphite, charcoal, or colored pencils, a realistic monkey drawing requires patience and skill to achieve a true-to-life representation of this fascinating primate.
Realistic Monkey Drawing: Easy Steps
Creating a realistic monkey drawing can be a rewarding challenge. Below is a Shading techniques for monkeys with detailed instructions and tips to help you achieve a lifelike representation of a monkey.
Step 1: Study Your Reference
Choose a high-quality reference photo of a monkey. Observe the proportions, fur texture, and lighting.
Pay attention to the monkey’s facial features, body structure, and posture.
Step 2: Sketch the Basic Shapes
Start with the head: Draw a circle for the skull and a slightly elongated oval for the muzzle.
Add guidelines: Draw a vertical line down the center of the head and a horizontal line for the eye level. This will help you place the facial features symmetrically.
Outline the body: Use simple shapes like ovals and cylinders to sketch the torso, arms, and legs. Monkeys have a hunched posture, so keep the spine curved.
Sketch the limbs: Use lines to indicate the arms and legs. Monkeys have long, flexible limbs, so ensure they are proportionate to the body.
Step 3: Refine the Outline
Define the face: Add the eyes, nose, and mouth. Monkey eyes are usually round and expressive. The nose is often flat with wide nostrils.
Shape the ears: Monkey ears are typically large and rounded. Place them on the sides of the head.
Add details to the body: Refine the torso, arms, and legs. Include the hands and feet, paying attention to the fingers and toes, which are long and dexterous.
Sketch the tail: If your monkey has a tail, make it long and slightly curved.
Step 4: Add Fur Texture
Study the fur direction: Observe how the fur flows on the monkey’s body. It usually grows outward from the center of the face and down the limbs.
Use short, directional strokes: Start with light pencil strokes to create the fur. Vary the length and direction to mimic the natural flow.
Layer the fur: Build up the texture by adding multiple layers of strokes. Use darker pencils (4B, 6B) for shadowed areas and lighter pencils (HB, 2B) for highlights.
Step 5: Shade and Add Depth
Identify the light source: Determine where the light is coming from to create realistic shadows and highlights.
Shade the face: Use soft shading to define the contours of the muzzle, cheeks, and forehead. Leave highlights on the brow ridge and nose.
Shade the body: Add shadows under the arms, legs, and tail to create depth. Use blending tools to smooth out gradients.
Enhance the eyes: Add depth to the eyes by shading the pupils and leaving a white highlight for a glossy effect.
Step 6: Refine Details
Add wrinkles and skin texture: Monkeys have wrinkles around the eyes, nose, and mouth. Use fine lines to depict these details.
Define the hands and feet: Pay close attention to the knuckles, nails, and skin texture.
Refine the fur: Go over the fur with sharper strokes to add definition. Use an eraser to lift out highlights and create a more dynamic texture.
Step 7: Final Touches
Check proportions: Step back and compare your drawing to the reference. Make adjustments if needed.
Add background (optional): If desired, sketch a simple background like trees or rocks to place the monkey in its natural habitat.
Sign your artwork: Add your signature to complete the piece.
Tips for Success:
Patience is key: Realistic drawings take time. Work slowly and focus on one section at a time.
Use a light hand: Start with light strokes and gradually build up darker tones.
Blend carefully: Avoid over-blending, as it can make the fur look flat.
Practice fur textures: Experiment with different pencil pressures and strokes to master fur rendering.
Take breaks: Step away from your drawing occasionally to refresh your perspective.
By following these steps and practicing regularly, you’ll improve your ability to create realistic monkey drawings. Good luck!